How to Build a Terrarium
 Before I begin on explaining how to build a terrarium, let me mention that I am not an expert. I have not written a book and I have built only one terrarium in my life. That said, my terrarium was not built for show and will hopefully become a thriving ecosystem.
There are many tutorials and books on how to build a terrarium and at least one of them admits that their instructions are for decorative purposes and that their creations won’t last long. That one shocked me; a book about building terrariums knowing the plants will die. Seems incredibly wasteful and expensive to me.
Anyway, my hope in explaining how to build a terrarium is to share my own endeavors, the decisions I made, why I made them and what seems to be working or not. I will be sharing how things fare in my terrarium and mistakes I’ve made in hopes that you won’t make them too. If you haven’t already done so, check out my article on Making a Terrarium – A Guide to Buying Your Supplies.
Plant Choice
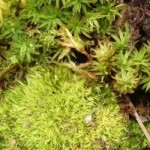
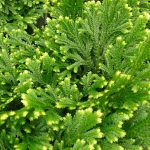
Every aspect of how to build a terrarium revolves around your plant choices. Traditionally, terrarium plants are “tropical” house plants. They do well in indirect light and the humid conditions of a closed environment. This tutorial on how to build a terrarium creates an environment suitable for plants like the miniature palm, rex begonia and fern that I included in mine. Succulents, cacti and sun-loving plants will require a different environment than the one these instructions creates.
Preparing the Container
Everything I read suggested washing, even bleaching the terrarium container. I purchased mine new. It was totally sealed and never contained food or anything else that might leave a residue. I skipped this step. Time will tell if that was a mistake.
Adding the Layer of Stones
 When it comes to tutorials on how to build a terrarium, most folks don’t spend much time on talking about the stones they chose. I picked decorative stones because I wanted them to add some color to my terrarium substrate. You might be surprised by how many stones you’ll need. I ended up using 2 pounds/bags of a larger sized stone (in hindsight, they were too big) and 2 pounds of a slightly smaller stone.
I think too, that I added too many stones in relation to the height of my jar. It’s working OK right now (10 days post-build) but there’s not much room for my little palm to grow.
The biggest advice I can give here is be careful. The Anchor Hocking 2-Gallon Heritage Hill Jar with Glass Lid that I used seems very strong but every time those rocks clinked down into it, I worried that it would break.
Mom heard the rocks as they hit the glass. She came around the corner and told me how she had built a terrarium back in the ’70s. When she went to move it, the bottom fell out of the glass jar – apparently she had cracked it when adding the rocks. You’ve been warned…be careful and never forget you are dealing with glass.
I added the rocks one and two at a time. Tedious yes; safer definitely. I didn’t see this advice in any of the how to build a terrarium articles I read before I began building mine. I would also suggest that you twirl the container (spin it in a twirling motion from side to side without lifting it off of the table) to let the rocks settle together better. Better to get them fairly tightly packed now then to have an earthquake after your plants and decorations are in place.
Adding the Charcoal
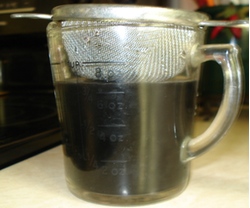 I’m not going to lie, this is messy. Charcoal, fresh out of the container, is dusty. You have to rinse that dust off, otherwise you will have black water in your terrarium. Check out the picture to the right. That’s what the water looks like when you run water through charcoal the first time.
As you can see, I used a small strainer – my charcoal was about the size of small aquarium gravel. (I’ve since been told that I don’t need something that small) I did small batches at a time. It took quite a bit of time and water to rinse it thoroughly before the water would run through it clearly. And, even after being rinsed, touching the charcoal still made for slightly black fingers.
It also made for a sink that reminded me of those tablets they give out to kids to show where they missed when brushing their teeth. Our enamel sink was discolored terribly. A little Comet and a light rub and it all came off. Just thought I would share that bit of info so you don’t panic when you see your sink.
I used something similar to Marineland PA0371 Black Diamond Activated Carbon – a far cheaper alternative to what I puchased.
How to Build a Terrarium – Mistake #1
I did say that I was going to share where things went wrong and adding the charcoal was perhaps the biggest mistake that I made. After I rinsed the charcoal, I put it on a small plate. When the water pooled, I drained it off the plate. I tried dabbing the charcoal with a paper towel, but it was so teeny that it just all stuck to the paper. It did remove a bunch of the water but then I had to carefully scrape all of the charcoal off of the towel.
The wet charcoal did pour into my glass container nicely and I could spread it around almost like cake icing. But, and this is a great big but, I had a whole bunch of standing water at the bottom of my terrarium and condensation covered everything in my container the next morning.
My suggestion would be to rinse the charcoal the day before you build your terrarium. Let it dry before adding it, otherwise you’ll be trying to squeeze a turkey baster through the dirt, charcoal and gravel layers in hopes of removing a lot of excess water from your terrarium. Been there done that, was very messy and rearranged several things in my terrarium.
Too Much Charcoal
I used charcoal/carbon that was the size of aquarium gravel. At the time, I thought smaller granules would mean the water would have to travel over more of the charcoal and therefore be more filtered.
Thing of it is, in a closed terrarium, there won’t be ‘running’ water. I used way more than I needed and one expert said that a layer of charcoal isn’t really necessary for a closed terrarium. She recommends adding some horticultural charcoal right into your soil mixture. You’ll still need to rinse it, but you won’t have anywhere near the mess that I did.
Adding a Charcoal/Dirt Barrier
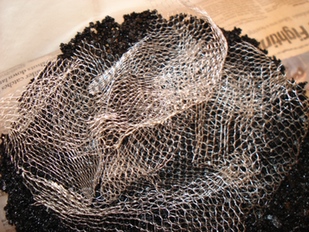 Here’s where I got creative, but not before wasting a lot of time. I thought I could easily use the mesh bags the rocks came in to create the barrier between the charcoal and dirt. I thought the bags were simply a tube of flat mesh that were tied at the top and bottom. Uh, no. They were circular and no matter how small I cut the pieces, I could not get them to lay flat.
Let’s just say I got a bit aggravated and just threw all the bits into the terrarium. My biggest concern was that it would show, so I tried to mound it all in the center. It was originally totally hidden. The turkey baster incident now has made a little show. This is why I’m recommending that you use Black Tulle from Amazon or your local crafts store. It would lay flat and it would be harder to see than the white stuff I used.
If you have it, you might also use a bit of black weed barrier fabric.
Adding Dirt to Your Terrarium
This section could also be entitled how to build a terrarium and make a big fat mess of things.
First off, let’s start with the dirt. Several sites said to sanitize it. I had a brand new, sealed bag of Miracle Gro. What did I need to sanitize? And, wouldn’t that kill good stuff too? (Why, yes indeed it does.)
Let’s just say that more than plants grow in Miracle Gro. My bag came populated with fungus gnat larvae. While some people might like to build an insectorium, I doubt they would want to populate it with minuscule gnats that get into everything and like dining on plant roots.
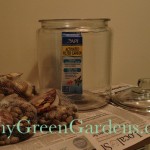
I’ll talk more about dirt in another post (My Miracle Gro Had Fungus Gnats). For now, my suggestion would be to put some of the dirt in a lidded glass container, water it, wait a week or so and see if you get some new pets. If not, you’re probably good to go.
Here’s where things get tricky. The best way to add dirt to a terrarium is to use slightly moistened dirt. Too dry and it goes everywhere and sticks to the glass, too wet and your plants will rot. I moistened mine just enough to keep it from being dusty but not really enough that most folks would call it wet. I suspect my dirt was OK but the charcoal was so wet that it dampened the dirt too.
Adding Your Plants & Decorations
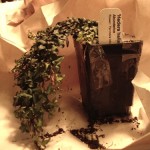
How to Build a Terrarium – Yet another mistake I made . . . My plants had been sitting in a glass bowl for almost two weeks. The dirt was quite wet and added moisture to an already too wet environment. I’m lucky in that I have only lost a bit of creeping thyme that was already dying from too much moisture. My advice here is to keep your plants watered prior to being added to your terrarium but do so in great moderation.
 That said, adding the plants and decorations to your terrarium is the best part of the entire project. It’s when all the work and expense finally begin to pay off.
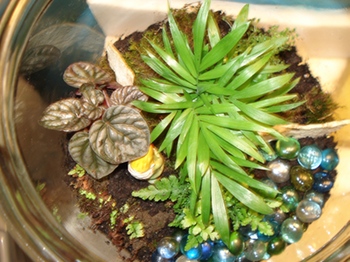
The big thing to remember with your decorations is that a closed terrarium like this one will create a fairly moist environment. Make sure whatever you add can withstand getting wet.
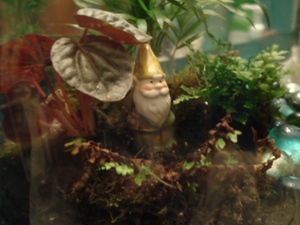
That big of yellow hiding under the begonia is a little gnome. In front of the gnome is some wild fern that I rescued from the garden. It was already dying when I dug it up and it probably won’t make it but figured I had nothing to lose.
As you can see I added some colored glass drops and two ‘white walls’. They’re slivers of brick from the garden. (We’ve had a few hard winters and some of our landscape bricks are actually splitting. Bad for the garden, but perfect for terrariums and fairy gardens.)
Updates
In the coming weeks, I’ll update you with how things go with my terrarium. Rather than just post a terrarium building tutorial, I thought I would share how things progress. After all, it’s easy to offer instructions if you never have to answer did it work long-term. Check back from time to time and I’ll let you know how things are going.