The Great 2015 Moss Gardens Experiment
I’ve talked about indoor moss gardens before. I find these little plants fascinating and the various species are often quite beautiful. I see some folks who have created lovely terrariums and moss gardens and often wonder how many of them have lived longer than a month or two. Some of the vivariums I’ve seen recently, truly look like miniature jungles and tropical rainforests.
I’ve talked to a lot of folks and it seems that a closed terrarium may not be the best choice for moss – the temperature and humidity are close but the airflow and lighting may not be. I’m also seeing more and more folks, who report success at keeping moss and lichens alive indoors, are giving their ecosystems more sunlight and artificial light.
Armed with some new terrarium soil and substrate from Josh’s Frogs I thought I would give moss gardening another go. I marched off into our backyard woods armed with a kitchen bowl, spoon and fork. (The fork ended up being the best harvesting tool.) After about an hour of roaming, I had a nice collection of different kinds of moss. Perfect to take what I’ve read and try building multiple moss gardens.
Step 1: Moss Preparation
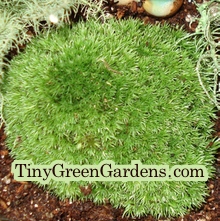
Washing Cushion Moss
 There’s always a risk when bringing anything that was once outside in. Moss is a great place for all sorts of little buggers to hide and often has seeds from other plants as well. The folks over at The Fern and Mossery recommend washing all harvested moss. Washing here doesn’t mean soap and water, it’s just using water to wash away the dirt, debris and bugs off of the moss.
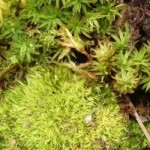
They showed what I believe to be cushion moss. Cushion moss is that fairly short moss that grows in round clumps. I gave it a good go but I was finding it virtually impossible to remove every bit of dirt from any of the mosses I had gathered. Saying I was trying to remove dirt isn’t quite right. These little colonies of moss had often latched themselves onto balls of clay – that nasty red stuff commonly found in North Carolina. Some of them had grown on and around little pieces of wood and they were not about to give up the center of their world either.
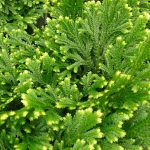
Washing Star Moss
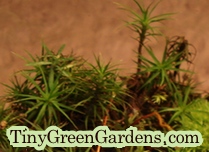 There was some stuff that looks like little pine trees that I could truly clean. The separated pieces seemed to have a fairly long tap root and I found some other pieces that were growing along a single root like a vine. When researching this moss, I first thought it was a club moss but that truly does look like miniature pine trees. What I had looked like a pine tree seedling. I believe it is actually star moss. And, should anyone visit this post looking for information on star moss, all I can say is if you find it growing outside in the open air, why would you ever think you could keep it happy living on the bottom of your water-filled aquarium? Shame on the folks selling these lovely little plants, knowing full well they are going to die in an aquarium and potentially put the swimming inhabitants of the tank at risk.
Sorta Washing Fern Moss
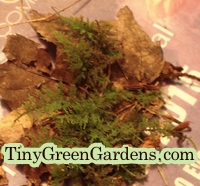 I was also skeptical about washing one of the other species I had harvested. The patches I found were growing on top of rotting leaves and pine needles. There was no soil attached to their tiny roots. In fact, I honestly didn’t see any roots at all, even on the pieces that came apart. It sounds like it’s fern moss, but I might be wrong.
As to fully removing all of the dirt and organic material from the mosses, I have also always questioned the idea of not keeping at least some of a plant’s original home intact to keep the plant from going into shock. Plus, I doubt I could recreate whatever balance of soil, plant matter and pH that had provided the moss’s former home.
So, long story short, some moss got well-washed, some was somewhat washed and the stuff on the leaves took a bit of a light swim but most of the leaf matter was left in place.
Step 2: Moss Garden Container Choices
For a truly scientific experiment, I should have used the same container and substrate preparation for all of my moss gardens. But, darn, what would the fun of that be.
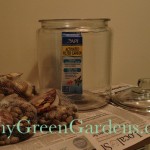
So, for the containers – we have my closed 2 gallon glass terrarium; a curved glass; a decorative, semi-closed decorative glass jar; and a flat, china flower pot.
Step 3: Soil Preparation
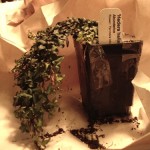
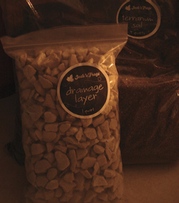 (Sorry about the photo, I was in a hurry to make my moss gardens and didn’t realize the picture was so bad.)
I used some new stuff I purchased from Josh’s Frogs for my moss gardens. They sell this porous rock-like stuff that weighs close to nothing – reminds me of pumice stone. It makes an awesome terrarium substrate as it added almost no weight to the container – a big plus after originally using stones in my 2 gallon, cookie jar terrarium. (I received some really pretty white material, the picture on Amazon looks as if they offer a more chocolate-looking color as well.) I also picked up a bag of their terrarium mix – it contains Coir, Peat, Vermiculite and Charcoal. (FYI – I believe they combine shipping – they did for me.)
Moss Garden 1 – The china pot – porous rock substrate, terrarium mix just poured on top.
Moss Garden 2 – The terrarium – porous rock substrate, landscape cloth, terrarium mix.
Moss Gardens 3 & 4 – The curved glass and glass jar (dinosaur garden) – porous rock substrate mixed with sand, terrarium mix.
I didn’t moisten the powder dry terrarium mix in all of my moss gardens. I probably should have. I saw a video, the other day, a woman used a squirt bottle to moisten her growing medium rather than pouring water onto it. Seemed to moisten the growing medium much more effectively, so for all of my moss gardens, I’m using two different squirt bottles to dampen the soil.
Moss Gardening
In the coming days, I’ll be posting information on each of my little moss gardens. I’ll share what species I believe they contain as well as how I created them. Hopefully, one or more of them will live long and prosper.