Fairy Garden Beach House – Step 1
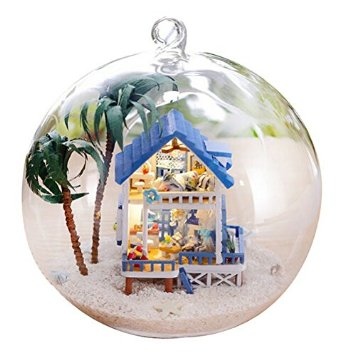 In a previous post, I mentioned that I found this charming little Romantic Aegean Sea Beach House Kit on Amazon. These kits are being sold all over the Internet. And yet, I haven’t seen anyplace where someone has actually bought one and put it together. How better review the Romantic Aegean Sea Beach House Kit than actually build one.
The instructions are in Chinese. I knew that going in. But, I had seen a few pages of the instructions from different kits and they appeared to be highly illustrated. So, I am keeping my fingers crossed that between the pictures and my own craftiness, I’ll be able to make this tiny beach house in a glass globe.
To give you an idea how detailed the instructions are, the first 10 pages are photos and the detailed parts list. The beach house construction doesn’t actually begin until page 11.
Aegean Sea Beach House Construction – Main Deck
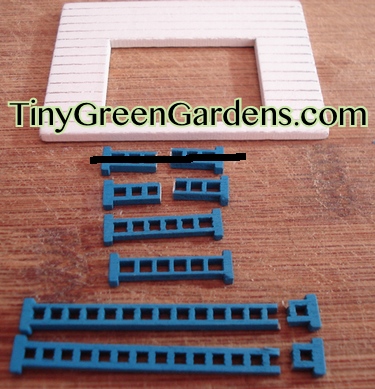 The instructions begin with one of the two most daunting aspects of creating the house where a mistake may not be recoverable – cutting some of the wooden pieces. (The other being cutting into the fabric.)
Using an adjustable razor knife thingy, you have to cut four three pieces of the pre-painted fencing. One of them is cut through the middle of the upright and the other pair are cut just next to one of the uprights.
Cutting through the middle of the uprights was more nerve wracking but somewhat easier. I tried cutting the other one, one cross-beam at a time and both together. Gently cutting one at a time provided a much nicer cut.
The kit came with a bit of sandpaper to make the edges smooth. As I feared, a little of the blue paint came off what will be exposed wood. Bummer. But, since it will be in a corner, I don’t think it will be visible. I dug in my markers and found a dry erase board marker that was an almost perfect match for the blue paint. yay.
The kit came with a little vial of glue. I going to use some tacky glue from my stash. I’m more familiar with it and the quick-set aspect should come in handy for this project. Plus, I know that when dry, it’s virtually invisible.
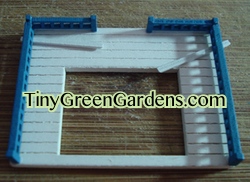 With the deck fencing, there are only two pieces that have the legs on both sides. I attached those first. Put a little glue on the corner of the floor and a little dab on one of the legs.
Did the long sides next after waiting a few minutes for the first two pieces to set. Put a bit of glue on the back corner of the floor and on the cut ends. I also took one of the other pieces from the kit to create a bit of a jig for the railing to rest on while the glue set.
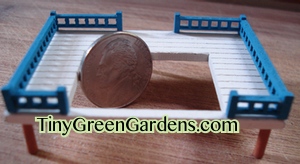
At this point, I realized that I have already made a big boo-boo. I should have only cut one of the six panel pieces in half. Guess I’m going to have to do a bit of a repair of the other one for the balcony railing, sigh. The kit has a little bunting that hangs from one of the railings. I guess I know which railing to put it on. 😉
Adding the Pylons
 After the railings were good and dry, I added the pylons on the bottom of the deck. Good thing the tiny beach house will be sitting in sand, these things were real stinkers to get straight.
I dripped each pylon in the glue and then positioned it on the deck. As they dried, they started listing. I just gently pushed them into a more straight position. They’re fairly straight but certainly would not pass the scrutiny of someone like Mike Holmes.


Very cute! Will be ordering one for my niece for Christmas.