Aegean Sea Miniature House Construction
 In a previous post on building the Aegean Sea Beach House, I mentioned that I found this charming little Romantic Aegean Sea Beach House Kit on Amazon. They’re pretty much everywhere on the web. The prices vary from just under $20 to one person trying to sell one for $90 + shipping. There’s several different models varying in size from the tiny one that gets put into a glass globe that I have to a larger, more detailed table-top model. I’ve seen a lot of folks eyeing them but no one appears to have documented their attempt at making the Romantic Aegean Sea Beach House kit.
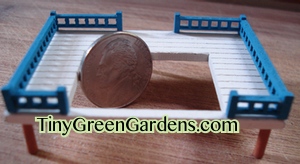
In my first post on building this tiny beach house, I worked on building the main deck that the house sits on. You can see by the nickel in the photo, how small this house is going to be. This post shares with you my adventures as I try to my hand at miniature house construction and assemble the walls and attempt to follow the mostly Chinese directions.
Miniature House Construction – Walls
The house is built with three walls. Each wall has either doors or windows or a bit of both.
Front Wall of the Tiny DIY Beach House
The front wall is the most complex, it has a set of French doors with four panels; a smaller set of doors, with a transom, on the second floor; and a balcony.
 The 3 pieces that create the French doors onto the balcony snap together and do stay in place without glue. I ran a teeny bead of glue along the seams on the inside of the panel just to be safe.
The photos of the completed house show these doors installed in a slightly open position. The instructions didn’t. Had I to do it again, I would have left mine a little open.
The ground floor French doors get put on in a later step.
Balcony Woes
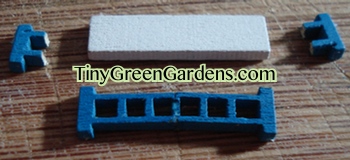 If you try building the Aegean Sea beach house, be mindful of the flat little white pieces. There are several that are quite similar in size. Thankfully, the detailed piece list includes the measurement of each piece in centimeters.
As you might notice from the photo, my railing had to be put back together after this first-time house builder cut too many pieces when I did the main deck railings. As if that boo-boo didn’t make life interesting enough, the little side pieces didn’t fit right.
 When making the main house deck railing it said to cut off a section of the long railings.
The pictures showed keeping the corner upright and one of the interior uprights. That left the long piece exactly the right size for the deck. However, my little pieces for the balcony were too big. If left to the original size, the railing ended up floating in air off the balcony floor and looking silly.
I ended up having to shave off the interior upright off of those two small pieces and then the balcony railing fit on the floor perfectly. Do measure yours before taking my word on this and shaving those little bits off.
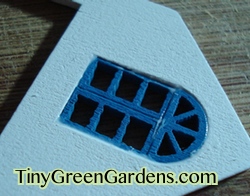
Adding the windows
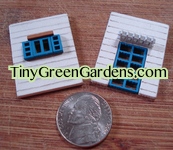 It threw me at first. The window on one wall fits on the outside of the cutout. Once that was clear; the third wall went together quickly. Love the little transom over the window and the shutters.
It wasn’t quite clear from the instructions how to hang the pergola over the side door. I opted to keep it simple and just glued it straight out.
Miniature House Construction – Raising the Walls
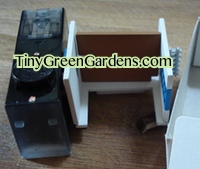 The photos imply that you put the three walls together and then add the flooring. I used an ink cartridge and a little box to hold the walls in place and slid the floor pieces in to help ensure everything was square. It probably would have been easier to attach the walls to each other and the ground floor, floor at the same time.
Once that all was dry, I added the second floor, floor. It lines up with the bottom of the balcony door but kinda just hangs out in space on the open side. I used the upright from the circular staircase to prop up the open side and to help ensure my floor was straight.
 The roof is cleverly designed. Four small “beams” are used for decoration and to position the roof on the side walls. I did everything I could to ensure it was all glued together square. Didn’t check it against the front wall piece. sigh. I must be a little crooked because one side fits on that front wall far better than the other.
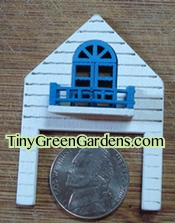
Miniature House Construction – Walls & Roof
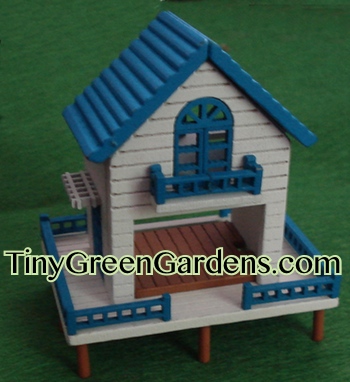 Here’s what my little house looks like so far. The entire thing stands about 2.5 inches or 7cm tall. The deck measures 6cm x 4.5cm or 2.25 inches x 1.75 inches.
Ain’t it cute.
Miniature house construction – who knew it could be this much fun?
Can’t wait to get started on the furnishings!
They’ve thought of everything…there’s an upholstered couch, chairs, bed, a makeup table with a bottle of perfume, an so much more.
You can get one of these great little house kits too, right on Amazon. They have a forest house, a Victorian at Christmastime and even a model of the house from the movie Up – complete with balloons.


You instructions and suggestions make it look easy. But, working with such teeny pieces must be hard.
The teeny pieces do require patience Gigi. Patience is definitely required. The kit makes it fairly easy though. Everything is so well-designed. Well, except for the lighting kit. That’s a total loss. LEDs are way too big. I still love this little house though. Even thinking of getting the woodland one too.